The sliding doors sometimes get a bad press - simply because they are different and mechanics are not familiar with them.
Remember that 90% of problems are due to the in-door actuator; another 5% are due to the B-post actuator; another 4% are due to dirty contacts at the front edge of the doors leaving just 1% for other faults.
There are some cheap in-door actuators on the market; the ones with the rubber bellows either don't work, or work poorly. Look for a genuine one, without the bellows. DO READ THE YELLOW SECTION about half-way down this page.
Youtube demo of worn and new actuator
Avoid forcing the doors manually as it COULD stretch the cables and MIGHT cause the slack to jam on the motor drum or over-rev the drive motor. Should the electrics fail, just use sufficient force to get the door moving; no more. This includes garage mechanics!
Failure to open the door on the remote or the door switches
Inside the door there is a complex set of Bowden cables to operate the locks. This shows the assemblies dismantled from the door.
This is the internal door handle mechanism - the internal handle is underneath in this picture. The actuator is top left and operates the main unlock cable.
This is the lock at the back of the door. The driver's side should have three mechanical and one electrical connection and the passenger side two mechanical and one electrical connection. They are complex inside with two small motors but are usually trouble-free - but bear in mind that they are now 15+ years old.
The electrically operated actuator:
A number have reported a failure (or slowed action) of this actuator as the cars age - the symptom is a failure to open the door on the remote or the door switches, though using the external door handle the door works OK.
It is possible to take the door panel off both doors and swap the actuator from the drivers side to the passenger side to check if it is faulty, however most will buy a new actuator and fit it. Note: in view of the time-limited lifespan of reliable operation (5 to 10 years) it is advised that you buy a new one rather than a second-hand one which may already be past its best. A few new ones are available on ebay but costs are escalating (2023) Also see my comment at the top of the page.
The actuator is item 21 on the drawing; ebay for "Peugeot 1007 door actuator". The Peugeot part number is 661536 - also for Peugeot 1007 door card clips as some are sure to break when removing the door card.
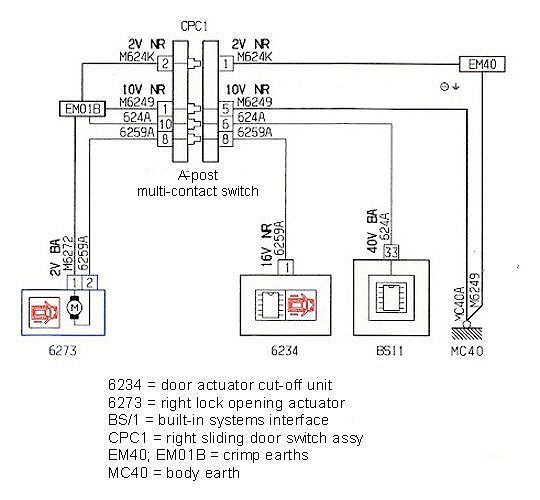
shows the wiring schematic - only two connections to the actuator so easy to check for 12 volts
shows the wiring harness (yellow) within the door.
this shows an actuator accidentally damaged when the mechanism was iced up - the links are still connected but out of line.
and another that was completely broken.
be aware that a damaged and jammed actuator can also mean the door won't unlock, trapping the driver inside. See below!
this shows the insides of an actuator - with the cover removed. It can be damaged if too much force is applied via the INSIDE door handle.
and, from another actuator, the motor and return spring have been removed.
The worm that operates the sliding section seems to lose lubrication which increases friction, although the permanent magnet motors are known to lose strength.
a close-up of the mechanism. The return spring is inside the black housing on the right.
Bench testing the actuator
A good actuator will pull in gently with just 3volts from a bench power supply; a worn one would not move.
After synthetic spray grease was applied to the moving parts on the worn actuator, the cover was refitted. The worn actuator will now pull in with 3volts so could be re-used, though it is not as enthusiastic and is noisier than a new actuator.
One of the indicators when on the bench is to disconnect the actuator supply after it has pulled in. A good actuator will push out enthusiastically and bounce when it hits the end stop; the worn one was significantly less keen and didn't bounce.
Note that the cheaper Chinese copies appear to work well on the bench, but several have found they are not reliable when in use. On closer inspection, they are of lighter construction and although they will pull in OK, they don't "bounce" when released. If the actuator doesn't push out fully, then it may not allow the door lock to release. If you should get a Chinese copy, then push the plunger in and gently release - if it doesn't fully extend under significant spring pressure then it may not work properly in your door.
Youtube demo of worn and new actuator
To access and replace the actuator:
see excellent "how-to" .pdf
see excellent "how-to" Youtube video
First - remove the door liner
have some replacement clips (6991 S6) available as some are sure to break! Always fit a full set of clips or the liner can bow out and touch the rear wing as the door opens as there is very little clearance. Always buy more than you need; they are cheap enough and several will break each time you take the door panel off!
- fully open the window
- use a fine screwdriver to prise off the small plastic panel behind the internal door handle - this reveals three Torx Pan Head screws.
- Remove the two Torx Pan Head screws A retaining the door liner.
- Slide door slightly open, so it comes away from the body of the car. Carefully unclip the liner from the door starting from the bottom - it comes away fairly easily. The top of the liner is hooked over the internal door skin.
- To get the liner out make sure all the clips are disengaged (pull outwards at the bottom) and lift it off the top lip; it should lift up easily. From the outside, lean in and pull the liner up and out through the open window - this is easier than sitting inside and pulling it towards you.
- Remove the remaining pan head screw B and slide the internal door handle assembly backwards and remove from the door.
- Remove the electrical plug from the actuator.
- Note that the Bowden cable does just clip on and off, so you can take the assembly to the bench to fit the actuator if you find it easier.
- Turn the door handle assembly over (take care not to bend the Bowden Cable) revealing two self tap screws that retain the actuator.
- Remove the screws and carefully release the actuator from the linkage - these clip together at 90 degrees - I found this a bit of a fiddle until Andrew told me the trick (note 2. below)
Warnings:
- Many parts on modern cars are built to very fine clearances - be very careful disengaging and engaging the end actuator loop with the lever as the end of the lever can break off. If you are in the factory doing 100's a day no problem but doing a one-off always takes extra care as you have to learn the trick.
- Andrew has pointed out that the actuator arm is actually two pieces clipped together and it is much easier to separate the two pieces which saves the fiddling about in 1. above. It is certainly far quicker - you learn something every day!
- If you should pull too hard on the cables when changing the actuator, it is possible to jam the lock mechanism at the rear of the door with confusing results. As access is very limited, try relaxing the lock mounting screws and if you are lucky the lock will click back to its normal position. Retighten the mounting screws.
- Be aware that a damaged actuator (as for example due to over-enthusiastic pulls on the inner handle) can jam the door lock and trap the person inside. After removing the inspection hatch and releasing, replacement is the only solution.
- On reassembly, first check the liner has all nine clips present; replace any missing or damaged. Leave the door slightly open and put the liner back through the open window. Ensure the top edge is securely located over the lip and then that all the clips are fully pushed home.
- If the liner rubs on the rear wing as the door opens, then either some of the clips are missing or are not pushed fully home